
Course IPSL: Image processing with Silverlight
Chapter C1: The Binary Image Project
Copyright © by V. Miszalok, last update: 17-06-2010


Let me know
what you think
| Home | Course Index | C1 Complete Code | PDF Version of this Page |
 |
Course IPSL: Image processing with Silverlight
|
 |
 Let me know what you think |
|
Install 1) Visual Web Developer 2010 Express English
and 2) Web Platform.
|
Guidance for Visual Web Developer 2010 Express: | 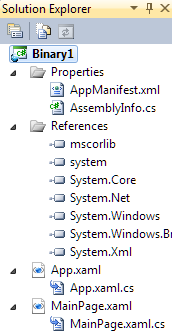 |
<UserControl x:Class="Binary1.MainPage"
 xmlns="http://schemas.microsoft.com/winfx/2006/xaml/presentation"
 xmlns:x="http://schemas.microsoft.com/winfx/2006/xaml">
 <Viewbox>
  <Image Source="Lena256.png"/>
 </Viewbox>
</UserControl>
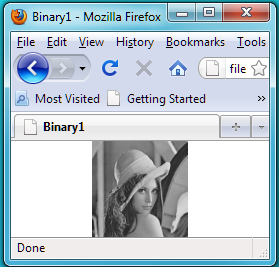
Start this code by clicking Debug → Start Debugging F5. Binary1 - Windows Explorer will appear and show C:\temp\Binary1\Bin\Debug\Binary1TestPage.html with Lena256.png. |
|
|
Open C:\temp\Binary1\Bin\Debug\Binary1TestPage.html with a text editor an replace its default content by the following HTML-code and save it: <!DOCTYPE html PUBLIC "-//W3C//DTD XHTML 1.0 Transitional//EN"
"http://www.w3.org/TR/xhtml1/DTD/xhtml1-transitional.dtd">
<html xmlns="http://www.w3.org/1999/xhtml" >
<head>
<title>Binary1</title>
<style type="text/css">
html, body { height: 100%; overflow: auto; }
body { padding: 0; margin: 0; }
#silverlightControlHost { height: 100%; text-align:center; }
</style>
</head>
<body>
<center>HTML in front of the Silverlight object.</center>
<object data="data:application/x-silverlight-2,"
type="application/x-silverlight-2" width="100%" height="70%">
<param name="source" value="Binary1.xap"/>
<param name="minRuntimeVersion" value="4.0.50401.0" />
<param name="autoUpgrade" value="true" />
<a href ="http://go.microsoft.com/fwlink/?LinkID=149156&v=4.0.50401.0"
style="text-decoration:none">
<img src="http://go.microsoft.com/fwlink/?LinkId=161376"
alt="Get Microsoft Silverlight" style="border-style:none"/>
</a>
</object>
<center>HTML below the Silverlight object.</center>
</body>
</html>
| Double click C:\temp\Binary1\Bin\Debug\Binary1TestPage.html to render it in your favorite browser: 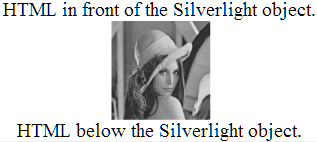 Please notice: |
|
At first we have to add a name and an event handler to our Image. using System;
using System.Windows;
using System.Windows.Controls;
using System.Windows.Media.Imaging;
namespace Binary1
{ public partial class MainPage : UserControl
{ WriteableBitmap wb0, wb1;
Byte threshold = 128;
public MainPage()
{ InitializeComponent();
}
private void myImage_ImageOpened( object sender, RoutedEventArgs e )
{ wb0 = new WriteableBitmap( (BitmapSource)myImage.Source );
wb1 = new WriteableBitmap( (BitmapSource)myImage.Source );
for ( int i=0; i < wb0.PixelWidth*wb0.PixelHeight; i++ )
{ if ( (Byte)(wb0.Pixels[i] & 0xff) < threshold ) //red channel only
unchecked { wb1.Pixels[i] = (Int32)0xff000000; } //black
else unchecked { wb1.Pixels[i] = (Int32)0xffffffff; } //white
}
wb1.Invalidate();
myImage.Source = wb1;
}
}
}
|
 Please notice: |
MainPage.xaml:
<UserControl x:Class="Binary1.MainPage"
 xmlns="http://schemas.microsoft.com/winfx/2006/xaml/presentation"
 xmlns:x="http://schemas.microsoft.com/winfx/2006/xaml">
 <Viewbox>
  <StackPanel Orientation="Horizontal">
   <Slider x:Name="mySlider" Width="100" Height="20" Maximum="255"
           Value="128" ValueChanged="mySlider_ValueChanged"/>
   <Image x:Name="myImage" Source="Lena256.png" Loaded="myImage_Loaded"/>
  </StackPanel>
 </Viewbox>
</UserControl>

MainPage.xaml.cs:
using System;
using System.Windows;
using System.Windows.Controls;
using System.Windows.Media.Imaging;
namespace Binary1
{ public partial class MainPage : UserControl
  { WriteableBitmap wb0, wb1;
    Byte threshold = 128;
    public MainPage()
    { InitializeComponent();
    }
    private void myImage_ImageOpened( object sender, RoutedEventArgs e )
    { wb0 = new WriteableBitmap( (BitmapSource)myImage.Source );
      wb1 = new WriteableBitmap( (BitmapSource)myImage.Source );
      mySlider_ValueChanged( null, null );
    }
    private void mySlider_ValueChanged( object sender,
                                        RoutedPropertyChangedEventArgs<double> e )
    { if ( mySlider == null ) return;
      threshold = (Byte)mySlider.Value;
      for ( int i=0; i < wb0.PixelWidth*wb0.PixelHeight; i++ )
      { if ( (Byte)(wb0.Pixels[i] & 0xff) < threshold ) //red channel only
             unchecked { wb1.Pixels[i] = (Int32)0xff000000; } //black
        else unchecked { wb1.Pixels[i] = (Int32)0xffffffff; } //white
      }
      wb1.Invalidate();
      myImage.Source = wb1;
    }
  }
}
|
 |
MainPage.xaml:
<UserControl x:Class="Binary1.MainPage"
 xmlns="http://schemas.microsoft.com/winfx/2006/xaml/presentation"
 xmlns:x="http://schemas.microsoft.com/winfx/2006/xaml">
 <Viewbox>
  <Border BorderBrush="Black" BorderThickness="1" Margin="3">
   <StackPanel Orientation="Horizontal">
    <Slider x:Name="mySlider" Width="100" Height="20" Maximum="255"
            Value="128" ValueChanged="mySlider_ValueChanged"/>
    <Border BorderBrush="Black" BorderThickness="2"
            Width="25" Height="20" Margin="3">
     <TextBlock x:Name="myTextBlock" TextAlignment="Center"/>
     </Border>
    <Border BorderBrush="red" BorderThickness="1" Margin="3">
     <Image x:Name="myImage" Source="Lena256.png" ImageOpened="myImage_ImageOpened"/>
    </Border>
    <Button x:Name="myButton" Content="Reset" Width="40" Height="20"
            Margin="3" Click="myButton_Click"/>
   </StackPanel>
  </Border>
 </Viewbox>
</UserControl>
MainPage.xaml.cs: |
Switch the compiler to produce a release-mode XAP-file via the main menu after start of VWD 2010 Express:
Debug → Build Binary1.
Your C:\temp\Binary1\bin\Release-directory will now contain a XAP-file Binary1.xap that can be incorporated into any HTML-page by:
1. Store it in the same directory as the housing HTML-page.
2. Copy your images into this directory.
3. Insert the following line into the <head>..</head>-clause of your HTML-page:
<style type="text/css"> html, body { height: 50%; } </style>
4. Call the Siverlight object from inside the <body></body> tags of the HTML-page by inserting the following HTML-code:
   <object data="data:application/x-silverlight-2,"
           type="application/x-silverlight-2" width="100%" height="100%">
    <param name="source" value="Binary1.xap"/>
    <param name="minRuntimeVersion" value="4.0.50401.0" />
    <param name="autoUpgrade" value="true" />
    <a href ="http://go.microsoft.com/fwlink/?LinkID=149156&v=4.0.50401.0"
       style="text-decoration:none">
     <img src="http://go.microsoft.com/fwlink/?LinkId=161376"
          alt="Get Microsoft Silverlight" style="border-style:none"/>
    </a>
</object>It is possible to detach Binary1.xap from its embedding Binary1TestPage.html and to create a stand-alone program that can be started in its own window. This mechanism works with all platforms and all browsers running the Silverlight 4 plug-in.
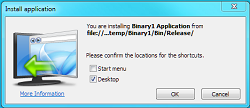
1. Main menu after start of VWD 2010 Express: Project → Binary1 Properties → Silverlight
→
Directory C:\temp\Binary1\Bin\ will contain a new sub-directory Release.
Copy Lena256.png, Butterfly.jpg and Ferropolis.jpg into this new sub-directory Release.
 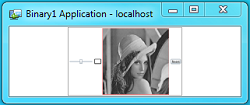 |
Double click Binary1TestPage.html and the Silverlight application is rendered by the favorite browser. |
| top of page: |