
Lectures on WPF
Introduction
Copyright © by V. Miszalok, last update: 2009-06-16

Let me know
what you think
| Home | Index all Lectures | Index WPF Lectures | Next >> | PDF Version of this Page |
|
Lectures on WPF
Copyright © by V. Miszalok, last update: 2009-06-16
|
Let me know what you think |
|
The problem of learning WPF = Windows Presentation Foundation is the notoriously steep learning curve due to its astonishing complexity.
The deeper you enter into WPF the deeper you will submerge in an ocean of structures and classes.
Microsoft wanted to create the ultimate and once for all toolbox of the GUIs of the future.
It came out a megalomaniac orgy of object oriented programming, a class library having more floors, staircases, halls, windows and balconies than the tower of Babylon.
Be prepared to hard mountain climbing !
The underlying truth is, that any modern GUI programming is incredibly complex and Microsoft's megalomaniacs did a good job to wrap this complexity into thousands of structures and classes.
I recommend learning WPF. I have no doubt that WPF-GUIs will set the world standard for the next 10 years.
And whatever GUI programming libraries and tools will come in the future, the inner logic of WPF will be their basis.
What is new in WPF compared with Windows Forms?
Windows Forms relies on the Windows API, a 20 years old library of user interface elements such as windows, buttons, check boxes, text boxes and so on. Every element has its own piece of real estate on the display and has to wait for a draw-event in order to be presented on the screen. The draw process doesn't use the GPU nor its shaders. The CPU executes any graphics and rendering. There is no possibility to take advantage of the power of modern graphic cards.
WPF changes all this by introducing a new model with different plumbing based on DirectX. Any element is composed of vector graphic primitives (except textures and videos). Windows, buttons, check boxes, text boxes render themselves as a part of one single operation accelerated by the hardware of the graphics card. WPF delivers gaming power to the user interface of ordinary Windows- and ordinary browser-driven programs. See Wikipedia.
Other advantages:
1. WPF creates size-independent user interfaces that scale well on different screens. All elements adjust themselves when their size and/or their content changes. That's the reason why any coordinate-based layout is strongly discouraged. Now the screen elements dynamically share the available space among their children at run time and they allow their children to grow and to bump their siblings out of the way. The transition to foreign languages is no problem anymore.
2. Visual elements are not longer restricted to a uniform outfit such as a rectangular shape or to a fixed order overlapping. They can have irregular borders, transparency, 3D-transforms and 3D-light, video content and animation.
Nobody is forced to use all these new features. The good old Windows Forms look and feel is still possible.
3. WPF supports page based applications running seamlessly in the browser. Windows programming and Internet programming merge to one common development.
4. WPF contains a platform independent subset Silverlight based on a plug-in for most browsers even under MacOS and Linux attacking Adobe Flash. Flash is restricted on client programming, but WPF isn't. It contains everything for server programming too.
The price of this flexibility is that all relations, priorities and all the dynamic behavior must be carefully designed using the huge WPF-toolbox of thousands of nested classes offering about a million methods, properties and events.
The best overview of the WPF Class hierarchy can be found in T.C. Huber's book: www.galileocomputing.de. See: Page1.pdf and Page2.pdf.
Microsoft describes WPF's design principles as follows:
Integration: Unified programming model that is consistent across controls, graphics, text, and media services, and that enables seamless integration of these elements within a single application. The WPF content model enables any control to host any group of other controls. To help arrange the content either in fixed or flow layout, WPF provides container elements that implement various layout algorithms in a way that is completely independent of the content that they are holding. Furthermore, data binding, templates, triggers, and animation provide visualized content and bring the UIs to life, giving users immediate feedback as they interact with the UI.
Vector graphics: WPF takes full advantage of the powerful graphical processing units (GPUs) that are part of modern PC systems. At its heart, the composition engine is vector-based, enabling WPF to scale all output to match the resolution of a specific output device. In situations where hardware rendering cannot be used, software rendering is available as a fallback. In addition, a floating-point logical pixel system and 32-bit ARGB color support provide a rich, high-fidelity visual experience that anticipates future technology needs, such as high-DPI displays.
Declarative programming: WPF introduces XAML (eXtensible Application Markup Language), an XML-based language for instantiating and populating nested object hierarchies. The design of XAML enables applications to parse and manipulate UI elements at run time. The XAML/code-behind model is supported both by the designer tool Expression Studio and the developer tool Visual Studio, which enable designers and developers to work collaboratively on application design and development.
Easy deployment: With ClickOnce for deployment and with support for both standalone applications and browser-hosted applications, WPF offers the best of both deployment models.
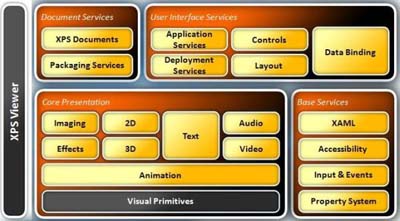 | Overall architecture and the key components of WPF. Links: XML Paper Specification = XPS XPS Documents Software Architektur mit WPF |
Guidance for Visual Studio 2008:
1) Main Menu after start of VC# 2010 Express:
|
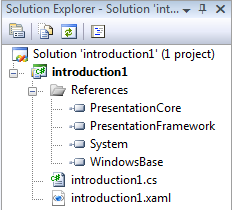
2) In the window titled: Solution Explorer -Solution 'introduction1' (1 project) we have to add 4 References and 2 code files: 2.1 Right-click the branch References. A drop-down menu appears. 2.2 Right-click the branch introduction1. A drop-down menu appears. 2.3 Right-click the branch introduction1. A drop-down menu appears. Check the properties of introduction1.xaml. The Build Action-property should be set to Page. |
 |
3) Main menu of Visual Studio 2008 → Project →
Write the following code into the empty introduction1.cs: |
 |
using System; //namespace of STAThread
using System.Windows; //namespace of Window, Application
public partial class myWindow : Window
//derive myWindow from class System.Window. The modifier partial indicates that there is additional code defining this class in another file (introduction1.xaml).
See: Window Class
[STAThread] static void Main() { new Application().Run( new myWindow() ); }
// The static void Main() method is the default entry point to our class derived from System.Window.
// [STAThread] prevents the program from running in default multi-threading mode.
// Application().Run( new myWindow() ) creates an instance of myWindow, starts a new thread and calls the constructor public myWindow().
See: Application Class,
Application.Run Method
public myWindow() { InitializeComponent(); } // main constructor
// To enable a XAML file and C# file to work together, the following are required:
// 1. The partial class myWindow calls the InitializeComponent() method to register the events and set the properties that the XAML code requests.
// myWindow must be a partial class with the same name that is specified by the x:Class attribute in XAML, and it must derive from Window. It must implement a constructor that calls the InitializeComponent() method which set the properties and registers the events written in XAML.
// 2. In XAML, the Window element must include the x:Class attribute.
// When the application is built, the existence of x:Class in the XAML file causes the build engine to create a partial class that derives from Window and has the name myWindow that is specified by the x:Class="myWindow" attribute.
// This requires the addition of a second namespace declaration for the XAML schema xmlns:x="http://schemas.microsoft.com/winfx/2006/xaml".
The XML-file introduction1.xaml has one root element Window with one child element Button.
<Window
xmlns="http://schemas.microsoft.com/winfx/2006/xaml/presentation"
xmlns:x="http://schemas.microsoft.com/winfx/2006/xaml"
x:Class="myWindow"
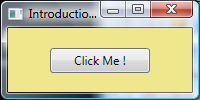
Title="Introduction 1"
Width="200" Height="100"
Background="Khaki">
<Button Width="100" Height="25">Click Me !</Button>
</Window>
The first two lines of the <Window>-tag look like URLs, but they aren't. You will see nothing when you start them with a browser. They address namespaces inside the .NET 3.5 framework, which define among others the keywords Class and Button. The only reason why both look like URLs is that Microsoft owns these URLs and nobody else has the right to use such names just to produce confusion.
Title, Width, Height, Background are properties that myWindow inherited from its base class Window.
Button is the only child of Window. It has its own properties Width and Height and the string "Click me !" is the button's visible content. See: Button Class and Button Members.
Restore the original after any experiment.
| 1 | Change the content of title bar from "Introduction 1" to "myFirstWPF". | Other title |
| 2 | Change the Width and the Height properties of Window. | Other size |
| 3 | Delete the line with the Width and the Height properties of Window. | Default size is much bigger. |
| 4 | Change the Background color from "Khaki" to "LightGoldenrodYellow". | Other color |
| 5 | Change the Width and the Height properties of Button. | Other button size |
| 6 | Delete the Width and the Height properties of Button. | The button fills the whole client area of myWindow. |
| 7 | Change the string "Click Me !". | Other button text |
| 8 | Remove the line and replace it by |
No change. Both syntaxes are equivalent. |
| 9 | Insert a new line in introduction1.cs into the constructor below the line InitializeComponent();: Title = "xxxxxx";. |
String "xxxxxx" overrides string "Introduction 1". |
| 10 | Insert a new line in introduction1.cs into the constructor below the line InitializeComponent();: Width = 400; Height = 200;. |
Double window size |
| 11 |
Insert a third namespace in introduction1.cs: Insert a new line into the constructor below the line InitializeComponent();: Background = new SolidColorBrush( Colors.Red );. |
Other background color |
In the Solution Explorer right click the branch introduction1.xaml. A context menu appears. Select Delete and kick out the XAML-file.
Replace the complete code of introduction1.cs by:
using System;
using System.Windows;
using System.Windows.Controls; //namespace of Button
using System.Windows.Media;    //namespace of SolidColorBrush and Colors.Khaki

public partial class myWindow : Window
{ [STAThread] static void Main() { new Application().Run( new myWindow() ); }
  Button button = new Button();
  public myWindow()
  { this.Title="Introduction 1";
    this.Width = 200; this.Height = 100;
    this.Background = new SolidColorBrush( Colors.Khaki );
    button.Width = 100; button.Height = 25;
    button.Content = "Click me !";
    this.AddChild( button );
  }
}
The result is identical and the question arises: Why all the hype with XAML ?
The first basic idea behind XAML is the separation of layout and logic:
Real programs consist of a) layout (= GUI = human interface = graphics) and b) logic (= data processing) and two different types of developers build them: a) designers and b) programmers.
Designers are too stupid to write code and programmers are too stupid to create usable human interfaces. It's better to separate them as far as possible.
Designers should write easy to learn XAML and programmers should write their complicated procedural code separatly in the backstage.
(This gives little sense in introduction1 where a poor guy is both designer and programmer in one person. But anyway it forces him to separate layout and logic what is not a bad idea.)
The second basic idea behind XAML is the unification of stand alone layouts and internet layouts running in a browser:
Layouts written in Java, C#, C++ etc. have to be completly rewritten when they are ported to the internet.
But XAML code is highly portable to any platform and runs in both worlds.
Up to now introduction1 does nothing but to present its layout. The button should do something.
Before making changes restore the initial state of the first program.
Add the following event handler to introduction1.cs: |
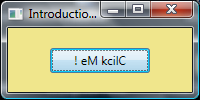 |
Replace the line which defines the Button in introduction1.xaml by:
 <Button Name="button" Click="onButtonClick" Width="100" Height="25">Click Me !</Button>
or by:
 <Button Name="button" Click="onButtonClick" Width="100" Height="25" Content="Click Me !"/>
Caution: The automatic XAML-indentation of Visual Studio 2008 Express is chaotic.
Adjust the indent in front of <Button ...> manually to one single blank.
There is no problem to write everything in C# without XAML-file as shown in the previous paragraph Without XAML. You just have to declare the event handler in the constructor:
| top of page: |