
Lectures on WPF
Routed Events
Copyright © by V. Miszalok, last update: 10-09-2008
Let me know
what you think
|
This lecture is based on the books of Nathan&Lehenbauer and MacDonald: |
 |
| Home | Index all Lectures | Index WPF Lectures | << Prev. | Next >> | PDF Version of this Page |
|
Lectures on WPF
Copyright © by V. Miszalok, last update: 10-09-2008
|
||
Let me know what you think |
|
A Routed evenet originates in one element but is raised by another one.
For example a Window contains many StackPanels and each StackPanel many buttons. A click occurs in a button and rises up to its StackPanel and then to the containing window where one code handles all clicks.
Routed events give us the flexibility to write our event handler code in the most conveniant place.
In the same way as WPF extends normal Properties to Dependency Properties it expands Events to Routed Events. Both Dependency Properties and Routed Events are designed to work inside trees of elements. DependencyProperties just travel down the tree to nested elements but RoutedEvents mostly travel up. Therefore, you can embed arbitrarily complex content inside a single button or give it an arbitrarily complex visual tree, and a mouse left-click on any of the internal elements still travels up.
Advantage: Event routing helps WPF applications remain oblivious to the depth, expansions, cuts and any details of their visual tree. The events will reach their event handlers regardless of how far away in the tree the destination may be.
Guidance for Visual Studio 2008:
1) Main Menu after start of VS 2008:
|
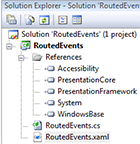
2) In the window titled: Solution Explorer -Solution 'RoutedEvents' (1 project) we have to add 4 References and 2 code files: 2.1 Right-click the branch References. A drop-down menu appears. 2.2 Right-click the branch RoutedEvents. A drop-down menu appears. 2.3 Right-click the branch RoutedEvents. A drop-down menu appears. |
 |
Write the following code into the empty RoutedEvents.cs: |
 |
Write the following code into the empty RoutedEvents.xaml:
<Window
 xmlns  ="http://schemas.microsoft.com/winfx/2006/xaml/presentation"
 xmlns:x="http://schemas.microsoft.com/winfx/2006/xaml"
 x:Class="myWindow"
 Title="RoutedEvents"
 Width="400" Height="400" FontSize="12" MouseDown="OnMouseDown" MouseUp="OnMouseUp">
 <Window.Resources>
  <Style TargetType="{x:Type Label}">
   <Setter Property="HorizontalAlignment" Value="Center"/>
   <Setter Property="Margin" Value="3"/>
   <Setter Property="Width" Value="200"/>
   <EventSetter Event="MouseDown" Handler="OnMouseDown"/>
  </Style>
 </Window.Resources>
 <StackPanel VerticalAlignment="Center" Margin="10" Background="LightGray" MouseDown="OnMouseDown">
  <Label Content="Red"    Background="Red"  />
  <Label Content="Green"  Background="Green"/>
  <Label Content="Blue"   Background="Blue" />
  <ListBox Name="listBox" Background="Khaki" Height="200" Margin="10"/>
 </StackPanel>
</Window>
Let's imagine a complicated label, which contains a stack panel which contains an images and a text box. The stack panel, the image and the text box derive from UIElement and UIElement defines (among others) a MouseDown- and a MouseUp-event. Thus, there are 4 possible sources of the MouseDown-event of our label:
1. the label itself (when somebody clicks the blank space inside the label border),
2. the stack panel (when somebody clicks the blank space inside the stack panel border),
3. the image,
4. the text box.
Mostly you want to treat all these MouseDowns the same way. The old fashioned method is to wire up all 4 MouseDowns to the same event handler. WPF provides a better solution with its routed event model.
It handles the MouseDowns as Bubbling Events that travel automatically up the containment hierarchy. When the image is clicked, n MouseDowns fire in this order:
1. Image.MouseDown
2. StackPanel.MouseDown
3. Label.MouseDown
4. the parent of the label fires its MouseDown
... every intermediary UIElement fires its MouseDown
n. finally the top of the element tree fires its Window.MouseDown or Page.MouseDown.
If the user releases the mouse button, the MouseUp-events fire again in the same order.
Any mouse action produces an avalanche of events !
Advantage: You can handle the event at the most appropriate level and stop the avalanche.
Every routed event chooses one of three routing strategies = the way in which the event raising travels through the element tree.
These strategies are exposed as values of a RoutingStrategy enumeration:
| 1. Direct | The event is only raised on the source element. This is the same behavior as a plain .NET event. |
| 2. Bubbling | The event is first raised on the source element, then on each element up the tree until the root is reached. Bubbling is the most popular strategy. |
| 3. Tunneling | The event is first raised on the highrst element of the tree (Window or Page), then on each element down the tree until the source element is reached. Tunneling is a merely exotic strategy. |
Handlers for routed events have the same signature as all .NET event handlers.
Sample: private void OnMouseDown( object sender, MouseButtonEventArgs e );
| sender | Is a System.Object typically named sender pointing to the element to which the handler was attached. |
| e | Is a class that derives from System.EventArgs. It is (or derives from) an instance of RoutedEventArgs, a subclass of EventArgs that exposes four useful properties: |
| e.Source | The element in the logical tree that originally raised the event. |
| e.OriginalSource | The element in the visual tree that originally raised the event (for example, the TextBlock or ButtonChrome child of a standard Button). |
| e.Handled | A Boolean that can be set to true to mark the event as handled. This is precisely what halts any tunneling or bubbling. |
| e.RoutedEvent | The actual routed event object (such as Button.ClickEvent), which can be helpful for identifying the raised event when the same handler is used for multiple routed events. |
The presence of both e.Source and e.OriginalSource enable you to work with the higher-level logical tree or the lower-level visual tree.
For more abstract events that don't necessarily have a direct relationship with an element in the visual tree (like keyboard events), the same object is passed for both.
The tunneling and bubbling of a routed event is natural when every element in the tree exposes that event. But WPF supports tunneling and bubbling of routed events through elements that don't even define that event! This is possible thanks to the notion of attached events.
Attached events operate much like attached properties (and their use with tunneling or bubbling is very similar to using attached properties with property value inheritance).
Sample: Let's define a StackPanel containing 2 Buttons. Both Buttons define a Click-event but StackPanel doesn't have such a Click-event. (Just derivatives of ButtonBase as Button, CheckBox and RadioButton have Click-events.)
Nevertheless we can attach an artificial Click-event to the StackPanel and to Page by using the following attached event syntax:
<Window
 xmlns  ="http://schemas.microsoft.com/winfx/2006/xaml/presentation"
 xmlns:x="http://schemas.microsoft.com/winfx/2006/xaml"
 x:Class="myWindow"
 Title="RoutedEvents"
 Width="100" Height="100" Button.Click="ButtonClickAttachedOnWindow">
 <StackPanel VerticalAlignment="Center" Margin="10" Background="LightGray"
  Button.Click="ButtonClickAttachedOnStackPanel">
  <Button HorizontalAlignment="Center" Content="Click Me !" Click="ButtonClick"/>
  <Button HorizontalAlignment="Center" Content="Click Me !" Click="ButtonClick"/>
 </StackPanel>
</Window>

using System;
using System.Windows;
public partial class myWindow : Window
{ [STAThread] static void Main() { new Application().Run( new myWindow() ); }
  public myWindow() { InitializeComponent(); }
  private void ButtonClickAttachedOnWindow( object sender, RoutedEventArgs e )
  { MessageBox.Show( "Button Click Attached On Window" ); }
  private void ButtonClickAttachedOnStackPanel( object sender, RoutedEventArgs e )
  { MessageBox.Show( "Button Click Attached On StackPanel" ); }
  private void ButtonClick( object sender, RoutedEventArgs e )
  { MessageBox.Show( "Original Button Click" ); }
} |
 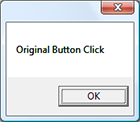 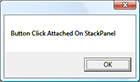 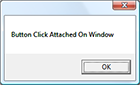 |
The sample handles the bubbling Click event raised by one of its Buttons on the StackPanel and on the root Window level. Because neither StackPanel nor Window define their own Click events, the event attribute names Click must be prefixed with the class name Button.Click. The event handlers simply show a MessageBox with information about what just happened.
Every routed event can be used as an attached event. Therefore you can handle every event that tunnels or bubbles with one top-level "megahandler".
| top of page: |