
Course 3D_XNA: 3D-Computer Graphics with XNA
Chapter C4: Wiimote
Copyright © by V. Miszalok, last update: 25-09-2010
Let me know
what you think
| Home | Course Index | << Prev. | Next >> | PDF Version of this Page |
|
Course 3D_XNA: 3D-Computer Graphics with XNA
|
|
Let me know what you think |
|
Brian Peek wrote an excellent managed library for
Nintendos Wii controller "Wiimote": WiimoteLib.dll, which allows to connect a Wiimote or a balance board to C# applications.
The main remaining problem is to get connected via Bluetooth because Bluetooth is a shaky technology that sucks.
It's relativly easy to get connected when your computer has build-in Bluetooth. In this case the driver uses a fixed COM-port once and forever.
When you have to use a USB-Bluetooth-stick, the driver dynamically installes upon each connection. During this installation it chooses an arbitrary COM-port between COM1 and COM15.
This port no. seldom fits to the stored COM-port no. of the last successfull connection and
Bluetooth will fail until you de- and re-install everything from scratch.
How to connect the Wiimote to your Windows 7 PC:
Plug a Bluetooth adapter into an USB-Port:
|
Method 1 = temporary Bluetooth pairing method: | 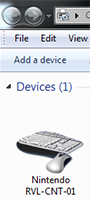 |
Method 2 = permanent Bluetooth pairing method:
Drawback: This method requires an external utility WiiPair.exe (written by Richard Lynch) that must be downloaded from
http://www.richlynch.com/code/wiipair and installed on your computer. WiiPair.exe is a console program that syncs the Bluetooth connection outside of the
Start → Control Panel → Devices and Printers → Add a device mechanism and it prevents
the computer and the balance board from disconnecting automatically.
2.1. Start → Control Panel → Devices and Printers.
2.2. Start WiiPair.exe and push both the "1" and "2" buttons of the Wiimote and hold them (the 4 blue LEDs of the Wiimote must blink).
2.3. Nintendo RVL-CNT-01 should appear in Control Panel → Devices and Printers as shown in Method 1.
2.4. Push the "1" and "2" buttons (the 4 blue LEDs of the Wiimote must blink) until the Nintendo RVL-CNT-01 is fully connected and
until the wiipair.exe-console quits with the line: "1 Wii devices paired".
Wait until both messages "Device driver software installed successfully"
and
"Bluetooth HID device is installed successfully" appear and vanish (can take up to 2 minutes).
2.5. Caution: Even method 2 doesn't connect forever.
It must be repeated after any PC boot/awake or after having switched off the balance board.
Caution: You cannot install the balance board in parallel, otherwise
wiimote1 will try to start the balance board instead of the Wiimote.
3. Test the Wiimote bluetooth connection:
3.1. Ensure having installed at least the Microsoft XNA Framework Redistributable 3.1.
3.2. Create a new folder C:\temp\WiimoteTest.
3.3. Download and store http://www.miszalok.de/C_3D_XNA/C4_Controller/wiimote_exe.zip and extract the ZIP-file.
3.4. Start wiimote1.exe.
If you obtain an error message such as "The device is not connected" or
"Can't find a Wiimote", you have to reinstall the Bluetooth connection from scratch.
4.1. Uninstall completely all Bluetooth Radios from Control Panel → System → Device Manager.
4.2. Remove the USB-Bluetooth stick and reinsert it into the USB port.
4.3. An "Installing device driver software + Click here for status"-message will appear.
4.4. Wait (up to 2 minutes) until two new messages "Your device is ready to use" and
"Device driver software installed successfully" will appear and vanish.
4.5. Goto Method 2.
If there is no way to connect to Nintendo RVL-CNT-01:
5.1. Check the batteries. (Wiimote has an excessive power consumption.)
5.2. Try another USB Bluetooth stick and do not install any special Bluetooth driver.
Windows 7 default Bluetooth and HID drivers works best.
See: Brian Peeks Blog,
Accessing the Wiimote.
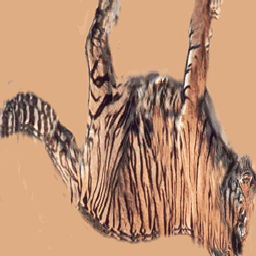
 | This program doesn't require such a 20 cm sensor bar carrying 10 infrared LEDs above or below the monitor. Normally the Wiimote camera detects the LEDs and computes the distance and the orientation of the Wiimote relative to the bar from the LED image. See: Wii Remote. Without these data, our program is merely blind and the 3 accelerometers deliver strange values. That's the reason why you obtain the best results when you do not point the Wiimote towards the tiger but to balance it in both hands. If you want a fully working Wiimote, just replace the sensor bar by two burning candles (horizontal distance about 20 cm) above your monitor. |
|
1. Main Menu after starting VS 2010:
|
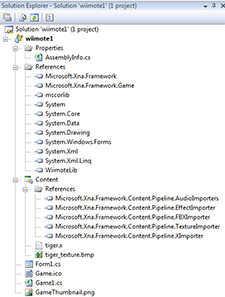   |
Throw away the default content of Game1.cs and write the following code into the empty window:
using Microsoft.Xna.Framework;
using Microsoft.Xna.Framework.Graphics;
using WiimoteLib;
using System;
static class Program
{ static void Main() { Game1 game = new Game1(); game.Run(); }
public class Game1 : Microsoft.Xna.Framework.Game
{ private GraphicsDeviceManager g;
private Model model;
private BasicEffect effect;
private float positionX = 0.0f, positionY = 0.0f, positionZ = 0.0f;
private float scaleX = 1.0f, scaleY = 1.0f, scaleZ = 1.0f;
private float rotationX = 0.0f, rotationY = 0.0f, rotationZ = 0.0f;
private Form1 form = new Form1();
private Wiimote wiimote = new Wiimote();
public Game1()
{ g = new GraphicsDeviceManager( this );
this.Exiting += new System.EventHandler( OnExit );
//Connect a common event handler to all 5 RadioButtons
for ( int i = 0; i < Form1.nRadioButtons; i++)
form.radiobutton[i].Click += new EventHandler( OnRadioButtonClick );
}
protected override void Initialize()
{ g.PreferredBackBufferWidth = 600;
g.PreferredBackBufferHeight = 600;
g.ApplyChanges();
g.IsFullScreen = false;
Window.AllowUserResizing = true;
Window.Title = "XNA Using Wiimote";
try { wiimote.Connect();
wiimote.SetReportType( InputReport.IRAccel, true );
wiimote.SetLEDs( false, true, true, false );
}
catch { System.Windows.Forms.MessageBox.Show( "Can't find a Wiimote" ); Exit(); }
form.Location = new System.Drawing.Point( Window.ClientBounds.Right + 8,
Window.ClientBounds.Top );
form.Size = new System.Drawing.Size( 100, Window.ClientBounds.Height );
form.Show();
base.Initialize();
}
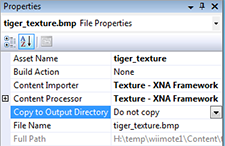
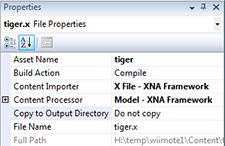
protected override void LoadContent()
{ model = Content.Load< Model >( "Content\\tiger" );
effect = (BasicEffect)model.Meshes[0].Effects[0];
effect.View = Matrix.CreateLookAt( new Vector3( 0.0f, 0.0f, 4.0f ),
Vector3.Zero, Vector3.Up);
effect.Projection =
Matrix.CreatePerspectiveFieldOfView( MathHelper.Pi / 4, 1f, 0.1f, 1000.0f );
}
protected override void Update(GameTime gameTime)
{ WiimoteState s = wiimote.WiimoteState;
for ( int i=0; i < form.checkbox.Length; i++ ) form.checkbox[i].Checked=false;
if (s.ButtonState.Left) { form.checkbox[ 0].Checked=true; positionX -= 0.01f; }
if (s.ButtonState.Right) { form.checkbox[ 1].Checked=true; positionX += 0.01f; }
if (s.ButtonState.Up) { form.checkbox[ 2].Checked=true; positionY += 0.01f; }
if (s.ButtonState.Down) { form.checkbox[ 3].Checked=true; positionY -= 0.01f; }
if (s.ButtonState.A) { form.checkbox[ 4].Checked=true; scaleX += 0.01f; }
if (s.ButtonState.B) { form.checkbox[ 5].Checked=true; scaleX -= 0.01f; }
if (s.ButtonState.Minus) { form.checkbox[ 6].Checked=true; scaleX=scaleY=scaleZ-=0.01f; }
if (s.ButtonState.Plus) { form.checkbox[ 7].Checked=true; scaleX=scaleY=scaleZ+=0.01f; }
if (s.ButtonState.Home) { form.checkbox[ 8].Checked=true; scaleX=scaleY=scaleZ=1f;
positionX=positionY=positionZ=0f;
rotationX=rotationY=rotationZ=0f; }
if (s.ButtonState.One) { form.checkbox[ 9].Checked=true; rotationX += 0.01f; }
if (s.ButtonState.Two) { form.checkbox[10].Checked=true; rotationZ += 0.01f; }
Point3F p = s.AccelState.Values; //read from the 3 acceleration sensors
try { form.trackbar[0].Value = (int)(p.X * 10); } catch {}
try { form.trackbar[1].Value = (int)(p.Y * 10); } catch {}
try { form.trackbar[2].Value = (int)(p.Y * 10); } catch {}
//p.X, p.Y can be negative, p.Z will be ignored
float px = p.X > 0 ? p.X : - p.X; //px is always positive
float py = p.Y > 0 ? p.Y : - p.Y; //py is always positive
//ignore the lower absolute value to avoid confusing rotations
if ( px >= py ) rotationX += 0.01f * p.X; //
else if ( py > px ) rotationY += 0.01f * p.Y;
}
protected override void Draw( GameTime gameTime )
{ g.GraphicsDevice.Clear( Color.DarkBlue );
effect.EnableDefaultLighting();
effect.World = Matrix.CreateScale( scaleX, scaleY, scaleZ ) *
Matrix.CreateRotationX( rotationX ) *
Matrix.CreateRotationY( rotationY ) *
Matrix.CreateRotationZ( rotationZ ) *
Matrix.CreateTranslation( positionX, positionY, positionZ );
model.Meshes[0].Draw();
}
private void OnExit( object sender, EventArgs e )
{ wiimote.SetLEDs(false, false, false, false);
wiimote.Disconnect();
form.Close();
}
//common event handler for all 5 RadioButtons
public void OnRadioButtonClick( Object sender, EventArgs e )
{ wiimote.SetLEDs ( form.radiobutton[0].Checked, form.radiobutton[1].Checked,
form.radiobutton[2].Checked, form.radiobutton[3].Checked);
wiimote.SetRumble( form.radiobutton[4].Checked );
}
} // end of class Game1
} // end of class Program
Replace the existing lines of Form1.cs by the following code:
using System;
using System.Drawing;
using System.Windows.Forms;

public class Form1 : System.Windows.Forms.Form
{ public const Int32 nCheckBoxes = 11, nTrackBars = 3, nRadioButtons = 5;
  public CheckBox[] checkbox = new CheckBox[nCheckBoxes];
  public TrackBar[] trackbar = new TrackBar[nTrackBars];
  public RadioButton[] radiobutton = new RadioButton[nRadioButtons];
  Label[] label = new Label[nTrackBars];

  public Form1()
  { StartPosition = FormStartPosition.Manual;
    BackColor = Color.White;
    for ( int i = 0; i < nCheckBoxes; i++ )
    { checkbox[i] = new CheckBox(); Controls.Add( checkbox[i] );
      checkbox[i].TextAlign = ContentAlignment.MiddleCenter;
    }
    checkbox[ 0].Text = "Left";
    checkbox[ 1].Text = "Right";
    checkbox[ 2].Text = "Up";
    checkbox[ 3].Text = "Down";
    checkbox[ 4].Text = "A";
    checkbox[ 5].Text = "B";
    checkbox[ 6].Text = "-";
    checkbox[ 7].Text = "+";
    checkbox[ 8].Text = "Home";
    checkbox[ 9].Text = "1";
    checkbox[10].Text = "2";
    for ( int i = 0; i < nTrackBars; i++ )
    { trackbar[i] = new TrackBar(); Controls.Add( trackbar[i] );
      label[i] = new Label(); Controls.Add( label[i] );
      trackbar[i].AutoSize = false;
      trackbar[i].TickStyle = TickStyle.None;
      trackbar[i].Minimum = -50;
      trackbar[i].Maximum = 50;
      label[i].TextAlign = ContentAlignment.TopCenter;
    }
    label[0].Text = "X-Acceleration";
    label[1].Text = "Y-Acceleration";
    label[2].Text = "Z-Acceleration";
    for ( int i = 0; i < nRadioButtons; i++ )
    { radiobutton[i] = new RadioButton(); Controls.Add( radiobutton[i] );
      //A common EventHandler "OnRadioButtonCheckedChanged(...)"
      //is already defined and connected in Game1.cs
    }
    radiobutton[0].Text = "Click = LED 1";
    radiobutton[1].Text = "Click = LED 2";
    radiobutton[2].Text = "Click = LED 3";
    radiobutton[3].Text = "Click = LED 4";
    radiobutton[4].Text = "Click = Rumble";
    foreach (Control c in Controls) c.BackColor = Color.Gray;
  }

  protected override void OnResize( EventArgs e )
  { Int32 w = ClientRectangle.Width;
    Int32 h = ClientRectangle.Height / Controls.Count;
    Int32 top = 1;
    for ( int i = 0; i < Controls.Count; i++ )
    { Controls[i].Top    = top;
      Controls[i].Left   = 2;
      Controls[i].Width  = w;
      Controls[i].Height = h - 2;
      top += h;
    }
    for ( int i = 0; i < nTrackBars; i++ ) trackbar[i].Height = h;
  }
}
Click Debug → Start Debugging F5.
If an exception occurs in game.Run(); check the Error List.
Probably there will be this warning: Found conflicts between different versions of the same dependent assembly.
Double click the warning. A Microsoft Visual Studio message box appears and asks: Do you want to fix these conflicts by adding binding redirect records in the app.config file ?. Quit by pressing Yes. An app.config item appears within the Solution Explorer-branch wiimote1 and solves the problem.
| top of page: |